Lab: Layer 3 Switching Pt.3 – Inter VLAN Routing with Switched Virtual Interfaces(SVI)

With Switched Virtual Interfaces, a Layer 3 Switch can forward packets between networks on its own – no external Router required.

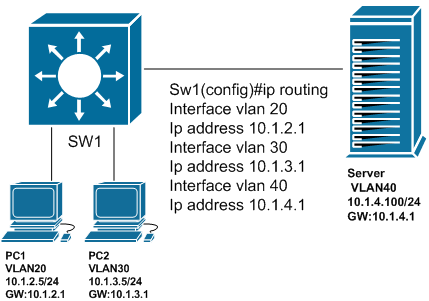
Compared to a normal Router with FastEthernet or GigabitEthernet Interfaces, Layer 3 Switches using SVI can forward packets between VLANS at backplane speed! To get an idea how SVI works, take a look at this graphic:


In this example we have 3 VLAN on the Layer 3 Switch: Vlan 20, 30 and 40. To be able to forward packets, IP Routing first needs to be enabled on a Layer 3 Switch:

sw1(config)#ip routing

As we need a gateway for each VLAN, we simply assign the gateway IP address to the equivalent VLAN Interface. Note that I left out the subnet mask in the image due to space restrictions. After that we put the VLAN interface online using the no shut command. You should see IP Addresses assigned to your VLAN Interfaces when using the sh ip int brief command.

Once your VLAN Interfaces are up and running with an assigned IP Adress, your switch is ready to forward packets.

Note: SVIs are also used to provide Layer 3 connectivity to a switch – for example if you want to access the switch via SSH or Telnet (seriously, do no use Telnet if you can use SSH).

The advantages of using SVIs to forward packets between your VLANs compared to using a Router or Router on a Stick are pretty obvious: Speed and Port density.

The disadvantage of this method is pretty obvious as well: It requires a Layer Switch such as the 3750 im using in my lab.

 

Lab: Layer 3 Switching Pt.2 – Inter VLAN Routing with Router on a Stick


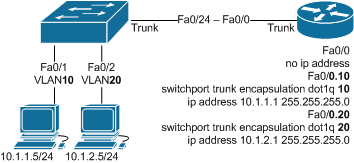
With the Layer 3 Switch set up in Pt.1  it is time to look at some basic concepts of Layer 3 Switching. The Router on a Stick concept is technically not Layer 3 Switching since the Packet Forwarding (Routing) requires a Router.

The basic concept of Router on a stick is implemented by creating subinterfaces on a single physical Router port. After the Switchport has been set to trunk mode (802.1q for you non-Cisco networkers), the subinterfaces can be assigned a VLAN by setting the trunk encapsulation to dot1q and a VLAN ID.


This concept should work with any switch that supports VLANs. Another advantage of this concept is the fact that only one Router port is required in order to forward Layer 3 packets between the VLANs. The downsides however are a single point of failure and possible congestion (depending on the amount of VLANs and bandwidth utilization).

Coming up next: Inter-VLAN Routing with Switched Virtual Interfaces (SVI) and Routed Ports which require Layer 3 switches.


Lab: Layer 3 Switching Pt.1 – Preparing vor v6 requirements

Preapring the Layer 3 Switch for v6

Before setting up the Lab Switches for some basic Layer 3 functions I will upgrade the IOS Images to make sure I can use v6 in the Lab environment as well.

3750-1#show boot
BOOT path-list : flash:c3750-ipbase-mz.122-25.SEB4/c3750-ipbase-mz.122-25.SEB4.bin

Since the 3750 is currently running an IP-Base Image I will neet to upgrade it to a IP-Services Image to be able to use advanced Layer 3 functions for v6 routing. In the BASE Versions of the 3750, only Staic v6 and RipNG are available.
So I grabbed the newest 3750 Image from the Cisco Web Page (requires a Login Account, but a Guest Account will suffice for the 3750 Image). Another benefit of an IOS Upgrade will be some improved security, since the current Image lacks some crypto functionality. This means no SSH – the lack of HTTPS can be neglected since we dont enable the http or the secure-server(https) on the device. The K6 tag in an Image name references to crypto features such as SSH some make sure your production equiptment supports it.
Since the Flash space was insufficient to store both the IP-BASE and IP-SERVICES Image I will have to delete the current IOS which can be done while the switch is running since the IOS image is in the RAM.
Make sure to back up your current IOS image to a TFTP server just in case.

3750-1#del /force /recursive c3750-ipbase-mz.122-25.SEB4#

The /force and /recursive options will delete the complete Image directory as well as bypass any confirmations on deleting files. You will want to use this feature in case you did in fact have the Webinterface set up since it will ask for confirmation on a huge amount of files.

#copy tftp://10.1.1.1:/c3750-ipservicesk9-mz.122-55.SE6.bin flash:/
Loading c3750-ipservicesk9-mz.122-55.SE6.bin from 10.1.1.1 (via Vlan123): !!!!!!!!!!!

Now would be a good time to grab a cup of coffee. Once this is done, we will boot the new image from global config mode:

3750-1(config)#boot system switch all c3750-ipservicesk9-mz.122-55.SE6.bin and reload from enable mode to boot into the new IOS image.

In the next part of the Lab, I will demonstrate Inter-VLAN-Routing using a trunk connection to a router (Router on a Stick) and Switch Virtual Interfaces (SVIs)